
Barcode Feature
Barcode Generation & Scanning
Generate barcodes for inventory items, customise and print barcode labels, and scan those barcodes during billing in myBillBook.
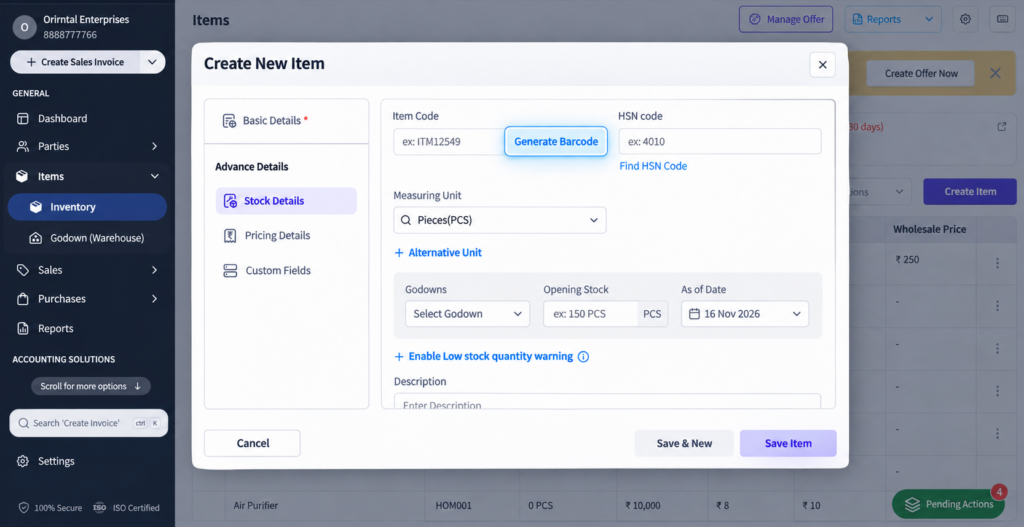
Barcode Generation in myBillBook
The barcode feature in myBillBook lets you create an item code for an inventory item and use it as the barcode linked to that product. Once the barcode is available, you can prepare barcode labels for the item and use the same code later for faster item selection during billing.
The barcode stays linked with the item record, barcode generation, label printing and barcode-based billing remain part of the same inventory workflow.
How to Generate a Barcode for an Item in myBillBook
Step 1: Open the Item
Go to the Items section and open the inventory item for which you want to create a barcode.
Step 2: Go to Item Code
In the item details, open the section where the Item Code is managed.
Step 3: Generate the Barcode Code
Use the Generate Barcode option to create the item code for that product.
Step 4: Save the Item
Save the item so the generated code remains linked with that inventory record.
Step 5: Use the Barcode for Labels or Billing
Once the barcode code is saved, you can use it when preparing barcode labels or when scanning the item during supported billing flows.
What Details Can You Add to a Barcode Label?
When preparing barcode labels on Web, you can choose which supported item details should appear with the barcode.
Core Item Details
Supported labels can include Business Name, Item Name, MRP, Selling Price, Batch Number, Manufacturing Date and Expiry Date.
Custom Item Fields
Supported custom item fields can also be added for details such as Brand, Colour, Material, Category, Rack Number or Internal Code.
Label Text Settings
Use the available barcode label settings to adjust font size and apply bold styling where supported. Empty selected fields can be omitted when there is no value for that item.
What Barcode Label Sizes Are Available?
Regular Printer Label Sizes
Supported Web sizes include 64 × 38 mm, 42 × 23 mm, 52.5 × 25 mm and 70 × 37 mm for compatible sheet layouts.
Label Printer Sizes
Supported label-printer sizes include 38 × 25 mm, 50 × 25 mm and 100 × 50 mm for compatible barcode labels.
myBillBook can remember saved barcode print settings so the same label setup does not need to be configured again every time.
How to Print Barcode Labels in myBillBook
Step 1: Open Items
Go to the Items section where your inventory items are listed.
Step 2: Select the Items
Select one or more items for which you want to prepare barcode labels.
Step 3: Open Barcode Printing
Click Print and choose the barcode printing option to open the Barcode Print screen.
Step 4: Set the Label Quantity
Choose how many barcode labels you want to print for each selected item.
Step 5: Choose the Label Size and Details
Select the required supported label size and choose the item information you want to show on the barcode label.
Step 6: Preview the Labels
Review the barcode label preview and make any required changes before printing.
Step 7: Download or Print
Download the prepared barcode labels as a PDF or print them through the browser using your configured printer.
How Barcode Scanning Works During Billing
Step 1: Open the Billing Screen
Start a supported sales or POS billing flow in myBillBook.
Step 2: Scan the Item Barcode
Use a supported barcode scanner configured with your device and setup.
Step 3: Match the Item
myBillBook identifies the inventory item linked with the scanned barcode or item code.
Step 4: Add the Item to the Bill
The matching item is added to the billing flow so you can continue billing without searching for the item manually.
Step 5: Complete the Invoice
Review quantity, pricing, tax and payment details and complete the bill using the normal sales workflow.
Where Is Barcode Generation & Scanning Useful?
Labelling New Stock
Generate and print barcode labels when inventory items need to be labelled before they are placed on the shelf.
Detailed Product Labels
Add supported pricing, batch, expiry or custom item information when the label needs more than just the barcode.
Multiple Item Labels
Select multiple inventory items and prepare the required number of labels from the same barcode print workflow.
Faster Counter Billing
Scan the barcode to find and add the linked inventory item during supported billing flows instead of searching manually.
Frequently Asked Questions
How do I generate a barcode for an item in myBillBook?
Open the item in myBillBook, go to the Item Code field, use the Generate Barcode option and save the item so the generated code stays linked with that inventory record.
What details can appear on a barcode label?
Supported labels can include Business Name, Item Name, MRP, Selling Price, Batch Number, Manufacturing Date, Expiry Date and selected custom item fields.
Can I choose different barcode label sizes?
Yes. On Web, myBillBook supports predefined label sizes for regular printers and label printers.
Can I print barcode labels for multiple items together?
Yes. You can select multiple items, set the required label quantity for each item and prepare them from the Barcode Print screen.
Can I scan item barcodes during billing?
Yes. In supported sales or POS billing flows, a configured barcode scanner can be used to match and add the linked inventory item.