Automate Recurring Bills
Automated Bills
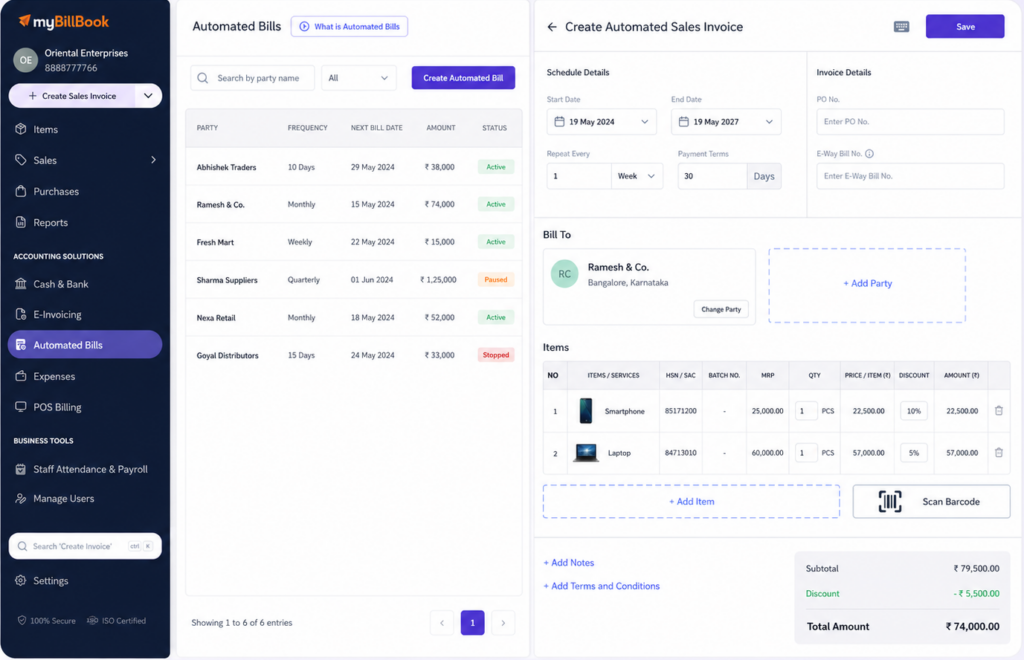
Create regular sales invoices automatically on schedule
Automated Bills Feature in myBillBook
How to Use Automated Bills Feature in myBillBook
Step 1: Open Automated Bills
Go to Automated Bills from your myBillBook dashboard or menu.
Step 2: Create Automated Invoice
Click Create Automated Invoice to start setting up the bill.
Step 3: Add Billing Schedule
Select start date, end date, billing frequency, and payment terms.
Step 4: Add Customer and Items
Choose the customer and add the products or services to be billed.
Step 5: Save Automated Bill
Review the details and save the automated bill schedule.
Automated Billing or Recurrent Billing Feature - Benefits
Track Details of all Automated Bills in One Place
Active Bills
View bills that are currently running as per schedule.
Paused Bills
Temporarily stop bill creation and resume it later.
Stopped Bills
View bills that have been permanently stopped.
Previous Billing Date
Check when the last invoice was created.
Next Billing Date
See when the next invoice is scheduled.
Bill Amount
View the amount linked to the automated bill.
Reminders and Payment Follow-Ups
Automated Billing does not just create regular sales invoices. It also helps with the next step after billing, such as reminding customers and sharing payment links where available.
SMS Reminders
Send customer reminders for automated bills based on the selected schedule.
Payment Link Sharing
Use payment links with automated bills to make collection follow-up easier.
Bill Sent Updates
Receive updates when an automated bill is created or sent successfully.
Things to Know About myBillBook Automated Billing Feature
Sales Invoice Only
Automated Billing is used for creating sales invoices.
Schedule Required
Start date, end date, billing frequency, and payment terms are needed.
Paused Can Resume
A paused automated bill can be resumed later.
Stopped Bills Cannot Be Resumed
A stopped automated bill cannot be restarted again.
Plan Access May Apply
Availability and limits may depend on the active plan.
Usage Limits May Apply
Some users may have limits on active automated bills.
Which Businesses Benefit Most from Automated Bills?
Regular Rental Businesses
Create regular bills for rent, equipment, or lease payments.
Subscription Businesses
Create scheduled invoices for repeated product or service plans.
Agencies and Consultants
Send your regular invoices for retainers or ongoing client works.
Frequently Asked Questions
Is Automated Bills useful when the bill amount changes often?
It works best when the same customer is billed with similar items or amounts regularly. If values change often, review the bill setup before continuing.
Can I create separate automated bills for different customers?
Yes. Create separate automated bill schedules for customers with different billing dates, items, amounts, or payment terms.
Will the customer receive the invoice automatically?
Automated Billing creates the invoice. Sharing the invoice or following up for payment should be managed separately.
What should I check before saving an automated bill?
Check customer name, items, amount, start date, end date, billing frequency, and payment terms before saving.
Can Automated Bills be used for GST invoices?
Yes, if your sales invoice includes GST details, the automated invoice will follow the invoice setup used in myBillBook